Word Processor
Word-Processing
Word processing is an application software that provides extensive tools to create, view, edit, format, store and print text materials for human communication. Examples are Word Star, Microsoft Word, etc.
Microsoft Office Word 2010
Microsoft Office word 2010 is a full-featured word processing program that allows you to create professional looking documents. It is developed by Microsoft Corporation, USA.
The advantages of Microsoft Office Word 2010 are:
• Allow to edit the document.
• Powerful desktop publishing tools.
• Powerful drawing tools to design 3-D effect.
• Contain many features that controls the appearance or format of the document.
Formatting a Document
Formatting is the process of enhancing the appearance of a document to make it more readable or attractive. Default page margin in world is 1.25 inches at left and right and 1 inch at top and bottom. Creating a bullet for list, displaying rulers, adding border and changing line spacing are some example of formatting.
Word’s Format Painter
The Format Painter will copy formatting from specific portions of your document and apply it to other portions of your document with a few clicks.
Steps to use the Format Painter:
• Select the text or graphic that has the formatting that you want to copy,
• On the Home tab, in the Clipboard group, click Format Painter.
Page Orientation
It is useful when you print your pages. Orientation refers to wheather the page is laid out horizontally (Landscape) or vertically (Portrait). By deafult Microsoft word shows page in Portrait orientation and in this case, page width is less than page height and page will be 8.5 inches x 11 inches. You can change page orientation from portrait to landscape.
To change page orientation, do following:
1. Select the Page Layout tab.
2. Click the Orientation command in Page Setup group.
3 Click either Portrait or Landscape to change the page orientation.
To change page size, do the following:
1. Click Page Layout tab.
2. Click the Size command, and drop-down menu will appear. The current page size is highlighted.
3. Click the size option you desire . The page size of the document changes.
Page Margin
Page margin is the space between the edge of page of MS Word where the text lies.
To change margin settings, do the following:
1. On the page layout tab, in the Page Setup group, click Margins.
2. Click the margin type that you want.
3. You can also specify your own margin settings. Click Margins, click Custom Margins, and then in the Top, Bottom, Left and Right boxes, enter new value for the margins.
Headers and Footers
A header is a text that appears at the top of every page in a document.
A footer is a text that appears at the bottom of every page in a document.
Steps to add headers and footers:
• Select the Insert tab.
• Click either the Header or Footer command. A drop-down menu will appear.
• From the drop-down menu, select Blank to insert a blank or footer, or choose one of the built-in options.
• The design tab will appear on the Ribbon, and the header or footer will appear in the document.
• Type the desired information into the header or footer.
• When you’re finished, click Close Header and Footer in the Design tab, or hit the Esc key.
Thesaurus
Thesaurus is the function of Microsoft Word that makes it possible to look up synonyms and antonyms to words as user type with a few clicks of mouse.
To use the Thesaurus, do the following
1. On the Review tab, click Thesaurus.
2. Press ALT and click the word that you want to look up. Result appear in the Reasearch task pane.
Adding Page Number
Microsoft Word automatically assign page number on the pages of your document.
To add page number, do the following:
1. On the Insert tab, in the Header and Footer group, click Page Number.
2. Click the page number location that you want.
3. In the gallery, scroll through the options, and then click the page number format that you want.
4. To return to the body of your document, click Close Header and Footer on the Design tab .
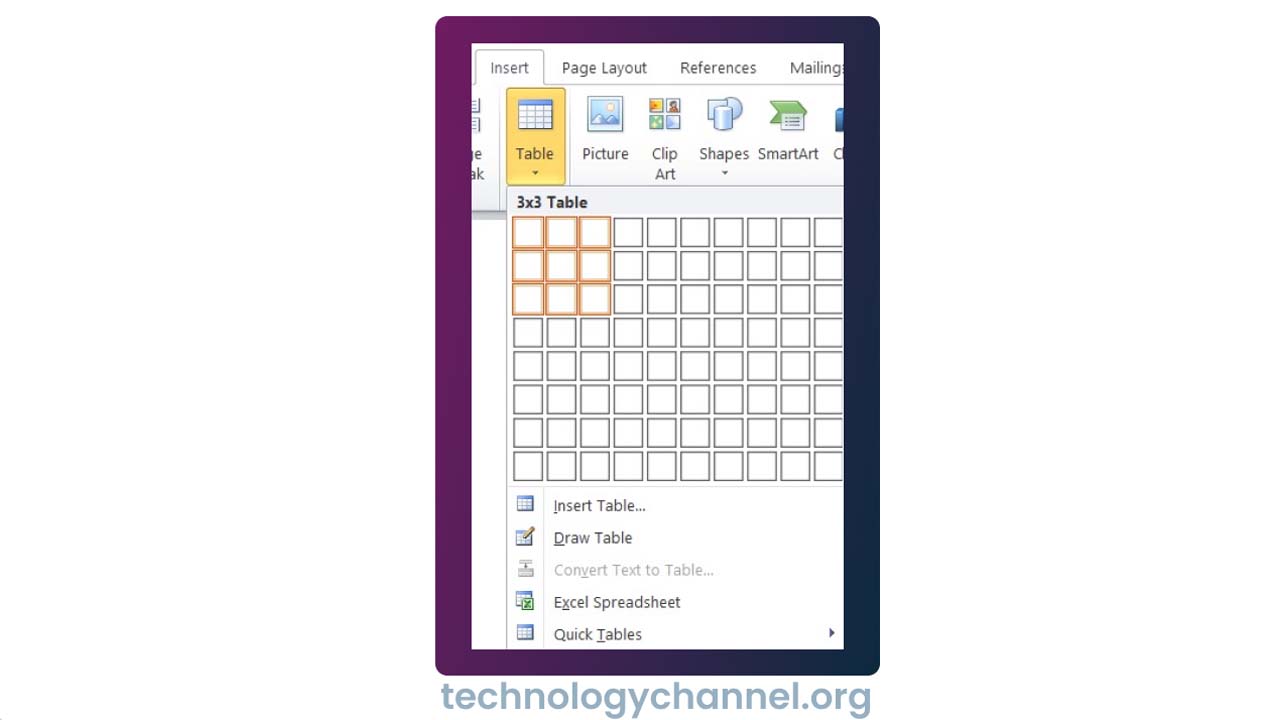
Tables in Microsoft word 2010
All tables are after all simply a grid arranged into columns and rows. You can use them to organize and emphasize certain pieces of information.
Inserting Tables
Before we identify the differents parts of table, lets go ahead and insert one into our document. To do this, Position the cursor at the point in the document where you want to put the table. Don’t worry if it’s not exactly right-you can always move or manipulate it later.
The tool you are going to use to insert a table is almost directly under the insert tab.
Click the table tool. You will see a bunch of boxes at the top. The easiest way to insert a table is to drag your mouse over the rows and columns until you have the amount you want. In this case, we are going to make a table that is three rows tall by three columns wide.
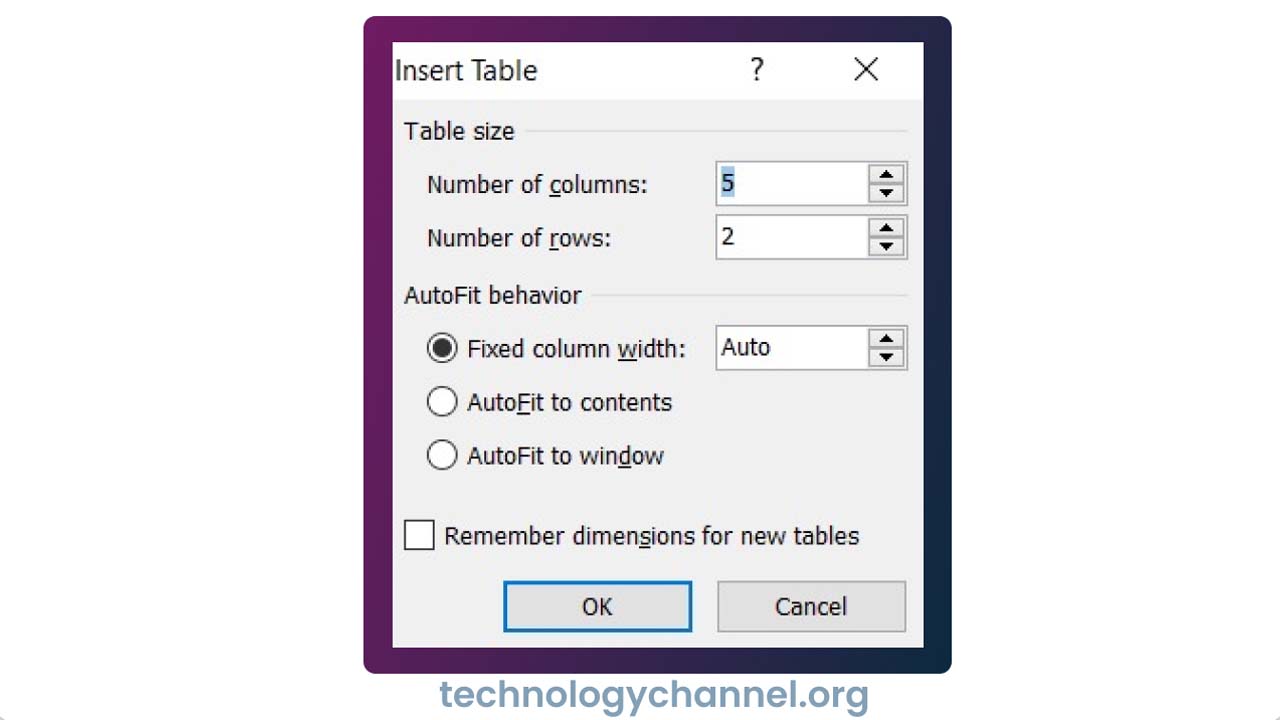
Using the Insert Table Dialogue
We can make table by adding no of row and columns in given Insert Table box.
Adding Row and Columns
There are two ways to add a new row or column to a table;
I)
- Select a cell, row or column and right click on it.
- Select Insert and choose one of the following.
* Insert Columns to the Left.
* Insert Columns to the Right.
* Insert Row Above.
* Insert Rows Below.
* Insert Cells.
II) Select a cell, row, or column
- Navigate to the Table/Layout tab.
- Choose an option from the Rows & Columns section of the ribbon.
Deleting Cells, Rows or Columns
- To delete a Cell, Row or column, simply select it, navigate to the Table Tools/Layout tab and click the delete button.
- You will then have the option of deleting a cell, a row, a column, or entire table.
- You can also delete cells, rows and columns by right-clicking inside a cell. In the menu select Delete Cells. Click the appropriate command and click OK.
Mergeing and Splitting Cells
To merge cells, drag your mouse over the cells while holding the left mouse button to select them. In the layout tab, select the Merge Cell button from the ribbon.
Alternatively, Select the cells you’d like to merge and click the right mouse button. Select the Merge Cells from the menu.
To split a cell,select it by clicking on it, then click the Split Cell button on the ribbon. This button is also found in the Merge group. Choose the number of rows and columns you’d like to split the cell into then click OK.
Boarders and Shading
The boarders and shading tools can be found in the Table Styles group on the Design tab under table tools.
- Use the Borders button to add or remove borders or adjust the stroke width. Use the Shading feature to control the color of a cell, row or column.
Inserting a picture
Images are the great way to liven up a document, and word offers a few methods to insert them. There are built-in clip art images for just about every topic, so you may be able to find a perfect clip art image for your document. If you have a more specific image in mind, you can insert a picture form a file.
Inserting clip art and picture
Adding clip art and pictures to your document can be great way to ilustrate important information or add decorative accents to existing text. You can insert images from your computer or search Microsoft’s extensive selection of clip art to find the image you need. Once an image has been inserted, you can format text to wrap around the image.
To locate clip art:
1. Select the Insert tab.
2. Click the Clip Art command in the Illustrations group.
3. The clip art options appear in the task pane to the right of the document.
4. Enter keywords in the Search for: field that are related to the image you want to insert .
5. Click the drop-down arrow in the Result should be: field.
6. Deselect any type of media you do not want to see.
7. If you also want to search for clip art on office.com, place a check mark next to Include Office.com content. Otherwise, it will just search for clip art on your computer.
8. Click Go.
To insert clip art
1. Review the result from a clip art search.
2. Place your insertion point in the document where you want to insert the clip art.
3. Click an image in the Clip Art pane. It will appear in the document.
To insert a picture from a file :
1. Place your insertion point where you want to image to appear.
2. Select the Insert tab.
3. Click the Picture command in the Illustration group. The Insert Picture dialog box appears.
4. Select the desired image file, then click insert to add it to your document.
Create Table of Contents
Step 1: Consider a document having different levels of heading.
Step 2: You can insert a table of content anywhere in the document but the best place is always at the beginning of the document. So bring your insertion point at the beginning of the document and then click the Reference tab followed by the Table of content button, this will display a list of Table of Contents options.
Step 3: Select any of the displayed options by simply clicking on it. A table of content will be inserted at the selected location.
Step 4: You can select number of levels of headings in your table of content. If you click on the Insert Table of Content option available in the option menu, then it will show you a dialog box wherw you can select the number of levels you want to have in your table of content. You can turn ON or Turn OFF the Show Page Number option. Once done, click the OK button to apply the options.
Step 5: Now if you press the Ctrl Key and then click over the any link available in the table of content, it will take you directly to the associated page.
Update the table of content
Step 1 : Consider you already have a table of content as shown above. Click the References tab followed by the Update Table button ; this will display the Update Table of Contents dialog box with two options.
Step 2 : If you want to update just the page numbers then select the first option Update page numbers only available in the dialog box but if you want to update page number as well, then select the second option Update entire table and you will find your table of content updated with all the latest changes.
Delete Table of Contents
Step 1: Consider you already have a table of content as shown above. Click the References tab and next Table of Contents button which will display a list of Table of Contents options along with Remove Table of Contents option available at the bottom.
Step 2: Click over the Remove Table of Contents option to delete the existing table of contents.
How to Electronically Publish a Word 2010 Document
1. Finish your document.
Yes, that includes saving it one last time.
2. Click the File tab and choose the Share command from the file tab menu.
The Share menu opens.
3. To use a more universal file type, choose Change file Type from the Share menu.
4. Use the save As dialog box to save your document in the special file format, and then click the Save button.
You can, if you want, change the document’s file name and location. The save As Type area of the Save as dialog box has preselected the file type you’ve chosen.
5. If you want to save file as PDF , choose the option create PDF/XPS Document from the share menu and click the Create a PDF/XPS button.
6. Give your document a new file name, if you want, or specify a new location for saving the file, then click the Publish button.
The PDF file is created. you need a copy of the Adobe Reader program to view PDF files. Don’t worry it’s free.
7. To send your document as an e-mail attachment, choose Share-> Send Using E-mail.
To do this easy e-mailing, you need to use Microsoft Outlook as your e-mail program and have an Exchange Server setup at your organization.
8. Click the Send As Attachment button.
At this point, Outlook takes over and you compose your e-mail message. When you send the message, your World Document is sent along, as well.
Mail Merge feature
Setting up Mail merge feature works in the following:
• Select document type.
• Select the starting document.
• Select recipient.
• Write your letter.
• Complete the merge.
Advantages of using mail merge are:
• It is simple and easy to use.
• Conditional formatting or options.
• Makes your work neater and professional.
To use mail merge, do the following:
1. Open an existing word document, or create a new one.
2. Click the Mailing tab.
3. Click the Start Mail Merge command.
4. Slect step by step Mail Merge Wizard.